Toning
with
'Duotones'
Continued.........
Clive R. Haynes FRPS
This can easily be done and the resulting change can be saved for further use.
Making your own Duotone
Using the preset Duotone that we've already experimented with, click on
the box adjacent to 'Ink 2' (A curving line.
When you click on this 'curve' it reveals an expanded view - This is the
'Curve shape' for this particular colour and presents opportunities for
modification.
By the way, if you have worked with 'Curves', you'll have a pretty good
understanding of what these curves are all about.
As you work on the curve you can watch the changes in the image.
The curve can also be set by entering
numeric values in the boxes presented in the 'Duotone Curve' box.
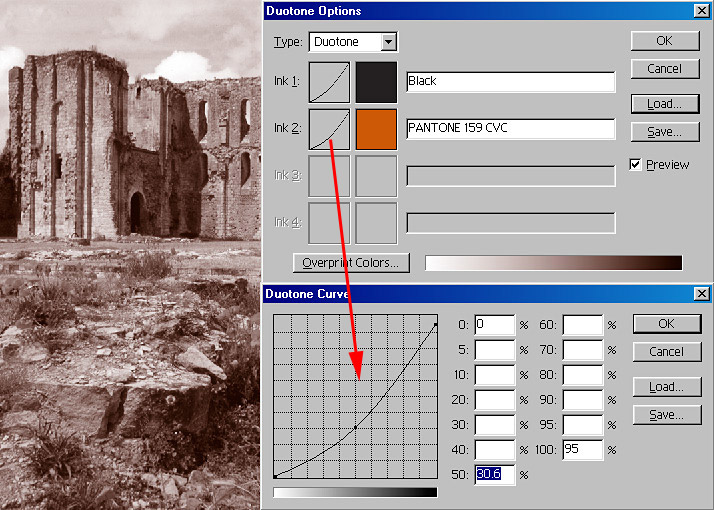
The 'Duotones Options' dialogue box with the 'Ink 2' curve revealed after double-clicking on the small curve box next to 'Ink 2'
Saving Your Own Duotone Versions
You may save the particular tone you have made.
Do not save it in the 'Duotone Curve' box (you'll have trouble finding
it again, honest!)
Save the changes in the 'Duotones Options' box - don't forget to give your new tone a name - this new tone (with its identifying name) will then be added to the list and you'll find it when opening next time.
More Options
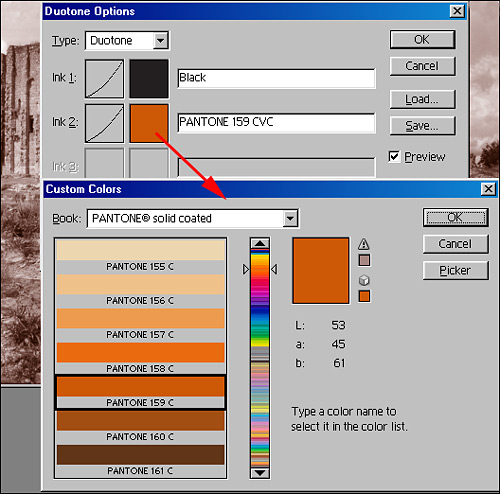
Other combinations and colour changes can be made by clicking on the
colour square and not the mini curve box. Doing this reveals the 'Custom
Colors' dialogue Box where there is whole spectrum of choice. The 'Book'
box shows the astonishing range available - click on the down arrow to
reveal the ranges available.
Choose a colour tone by sliding the twin arrows on the bar up or down
and click OK.
The range of tones to the left give an 'expanded view' of the point where
the sliders are
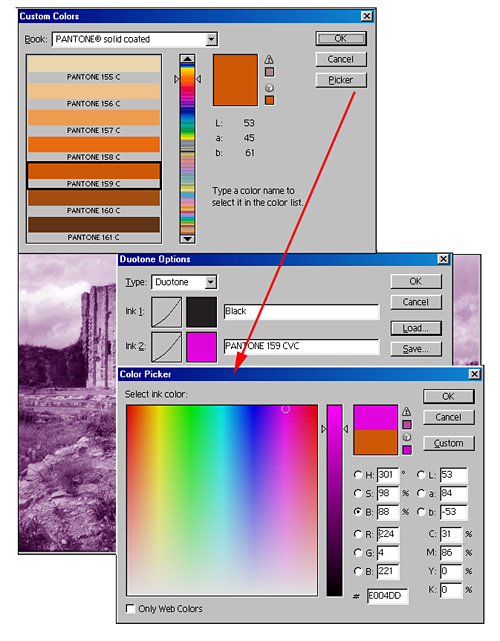
The effectiveness of the change depends upon the shape of the curve for
the tone. As you know, you can change the shape of the curve.
In the example below a lilac shade has been selected (not, of course, to everyone's taste!)
Tritones & Quadtones
Having gained an understanding about how to select and modify a Duotone, try your hand at Tritones and Quadtones. They all work in similar ways but with more colour combinations to modify.
Don't ignore the so-called 'Gray Tritones' and Gray Quadtones', these can be most effective for producing high quality monochrome images.
Combining Duotones
We can combine duotone/tritone/quadtone images
with one another, however this cannot be done in 'Duotone' Mode as only
one Duotone is allowed at a time.
To combine Duotoned images in a multilayered image, each Duotone must
be first changed back to RGB, saved as a separate file - then,
after pasting-in to a fresh image document, the layers may
be mixed and blended.
Reminder: To change your Duotone back to RGB do this via, Image > Mode
> RGB Color
Ready to Roll?
Now that you have discovered the New Universe of Duo, Tri and Quadtones, take time to explore and experiment for this paper has only opened the door - walk inside!
Printing Duotones
can sometimes be tricky.
The whole Duotone and Pantone system is ideally best suited to high-end
commercial printers. Most of us will be using high grade 'domestic' printers
(the 'domestic' Epson range most likely).
These printers often interpret the Duotone colour slightly differently
from what appears on the monitor. To overcome this a little experimentation
is necessary. Sometimes the 'slightly different' tone produced is even
more attractive!