Dealing with a 'Colour Cast'
Clive R. Haynes FRPS
These
notes have a specific reference to dealing with a colour cast within a scene where
the shift in colour balance is caused by the lighting being 'out of balance' with
the film type or camera setting (DI camera 'white balance').
A typical example
would be a scene shot on daylight-balanced film under artificial light (tungsten,
fluorescent strip etc) conditions.
These
notes are not intended to correct for a colour cast that may be encountered during
the printing process - the sort of 'differential' between monitor and printer.
Should this type of cast be a problem, then it's best addressed by using one of
the 'Colour Adjustment' options (see the list near the bottom of this page), or
by referring to the section dealing with this specific difficulty.
The
'Gray Point Eyedropper'
The three eyedropper icons in both the 'Levels' and 'Curves' dialogue boxes allow
us to set the black point and white point whilst the 'Gray
Point Eyedropper' is for setting a neutral tone of grey - and it's
this facility we'll be using to deal with 'Colour Cast'.
The
examples below show the 'Levels' dialogue box but the operation is the same for
'Curves'.
To use the 'Gray Point Eyedropper', simply click on the one you need, then take the cursor into the image and click on the point you wish to set as absolute black and/or peak white. You'll see a change in the shape of 'Levels Histogram' and if using an individual Red, Green or Blue 'Channel', the black & mid-grey or the white & mid-grey settings for that channel will shift.
The scene below is an example of the sort of problem.
This is a picture of yours truly giving a talk to a group of people under ordinary tungsten room light. As you can se there is a severe warm colour cast.
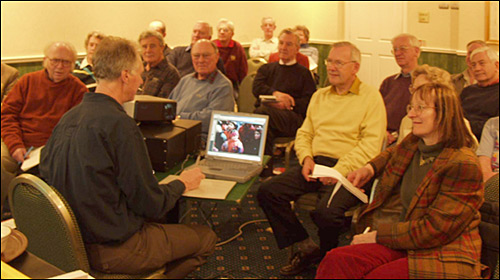
This is where the 'Grey Eyedropper' is of great use.
The
preferred route is via an 'Adjustment Layer' - as the 'Mask' facility within the
Adjustment layer allows you to selectively erase the corrected areas should you
so wish.
If your uncertain about 'Adjustment Layers' use the link at the
base of this page.
Creating a 'Levels'
Adjustment Layer.
At the base of the
Layers palette, click on the half black / half white circle icon ![]()
From the 'drop-down' list that appears, choose
'Levels' or 'Curves' - whichever is your preference.
From whichever dialogue box you prefer ('Levels' or 'Curves' - although the examples
below are for 'Levels') click on the 'Set Gray Point' Eyedropper and look carefully
at the image.
Find an area of what should be neutral grey, no matter
how small, it could be a pair of grey trousers, a grey shirt or a grey piece of
machinery - whatever. Click on this and hey presto - the image tonality instantly
shifts to make the grey tone a neutral grey, shifting the colour bias of the whole
image - magic!
If alternative neutral greys are in the scene, try each
until the correct tonality is achieved.
Note: The area of image that should be grey must have been
included in the original scene - it has to have received the same lighting (or
mix of lighting) as the scene. It's no good generating a neutral grey afterwards!
Let's see what happens when we tackle the scene above in this way. In our example,
I was fortunate to have more than one reference grey point.

Having fixed the problem some fine tuning may be necessary.
Photoshop features several controls that can help in manually shifting the colour bias of the image either generally or targeted to a specific area. The most usual routes are accessible via the Image > Adjust menu, or more preferably via an Adjustment Layer and are:
Color Balance
Hue & Saturation (adjust the Hue slider)
Replace Color
Selective Color
Channel Mixer
Variations (not via an Adjustment Layer)
Anticipate the Problem
- Plan Ahead
If you are aware of the potential problem of colour cast
before you shoot, then introduce a Kodak Grey Card into the scene - it can be
cropped off later or 'cloned out' with the Clone Stamp tool. Be careful to position
the Grey Card under the same lighting conditions as for the subject/scene for
it to be effective.
Mixed
lighting?
Either place the Grey Card in a position to receive the mixed
light or take two pictures. Later, correct each separately and combine the result.
A Reminder: After
loading/scanning the image into Photoshop, make an Adjustment Layer and choose
'Levels' or 'Curves' then with the 'Set Grey Point Eyedropper' activated, click
on the Grey Card in the scene and the correction is instantaneous!
Same
Problem - Same lighting - Different Scenes?
If you have several scenes
all with the same lighting/colour cast, shoot one scene with the Gray card.
After correcting in Photoshop, click & drag the corrected 'Levels' / 'Curves'
Adjustment Layer from the first image window onto the next image. The Adjustment
Layer will appear in the new image Layers Palette with the adjustment already
made.
If you have used the mask facility to paint out/mask areas on the Adjustment
Layer of the first image, you'll need to fill the 'copy' Adjustment layer on the
new image with white to delete these areas.
Alternatively,
the settings for the corrected scene could be 'saved'.
Do this by clicking
on the 'Save' button in the 'Levels' dialogue box. Give the correction a name
and save it in a folder.
Next
time, when the same correction is required, click on the 'Load' button in the
'Levels' dialogue box, go to the necessary folder, find the title you require,
click and it will be done. Simple.
To discover more about transferring Adjustment Layers from one image to another - click on the link below.