'Soft Focus Effect'
Clive R. Haynes FRPS
This technique has its origins in traditional photography and darkroom methods when on-camera diffusion lenses, a fine mesh (stocking material sometimes used) was an option over the enlarger lens or changing focus position during exposure were all methods used to make skin tones more glamorous and flattering.
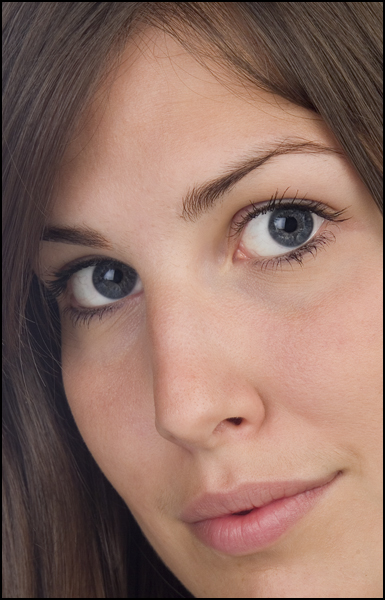
The images below are large but necessary to illustrate the 'before' and 'After' effect of the technique
The effect is intended to be subtle and the difference does show, however the fidelity will depend upon the resolution of the screen display.
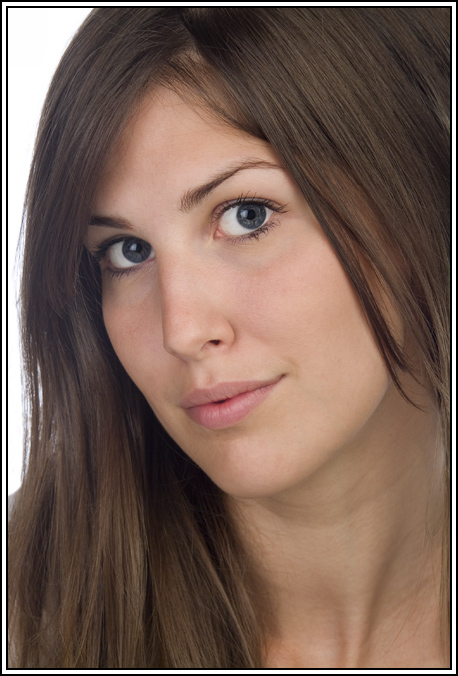

The idea is to create gentle skin texture on a portrait whilst maintaining detail and sharpness where required.
Open the image
Make
a duplicate of the image and place it on the layer above.
Name this layer
'Blur 1'
Working
on the 'Blur 1' Go to:
Filter > Blur > Gaussian Blur, set the amount to between
4 and 12 pxls (the amount depends upon image file size)
Set Layer Opacity
to 80%
Blend Mode: Change from 'Normal' to 'Lighten'
Next:
Make another duplicate of the image and arrange it to be below 'Blur 1'
Name
this (new) layer 'Blur 2'
Working
on the 'Blur 2'
Go to: Filter > Blur > Gaussian Blur, set the amount to around
50% of that used for 'Blur 1'
Set Layer Opacity to 40%
Blend Mode: Change
from 'Normal' to 'Darken'
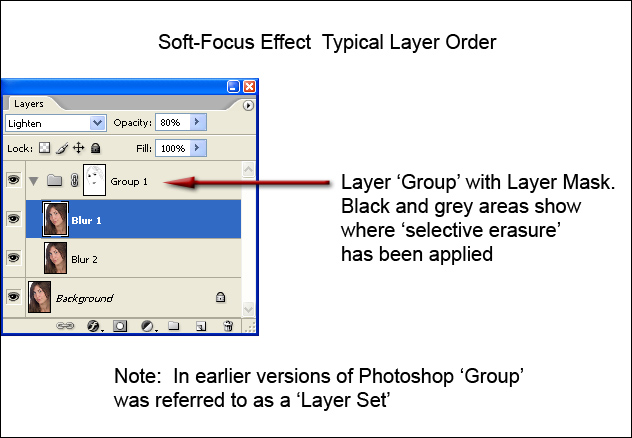
Selective Sharpening and Finishing Touches To carry out this phase we need to treat the two 'Blur' Layers as a single unit, yet keep our options open for possible further work on either of the two 'Blur' Layers.
The option of 'Merging' the two 'Blur' Layers would remove this possibility so wishing to retain 'maximum flexibility' we're going to create a Layer 'Group'.
Creating a Layer 'Group'
Highlight
(activate) both 'Blur' Layers.
Click & drag these two Layers to the 'Group'
icon (it looks like a 'folder' - to the right of the Layer Mask icon) at the base
of the Layers palette.
A
Layer 'Group' will appear.
The two 'Blur' layers are inside this 'Group'.
(To view and work further on the individual 'Blur' Layers, click on the large
arrow on the 'Group' to the left of the 'folder').
You can 'name' the 'Group'
if you wish, just like a normal Layer (name it 'Blur' perhaps).
Note for Creating a 'Layer Set' - this applies to earlier versions of Photoshop
Link'
the two 'Blur' by using the 'Link' icon (click in the little grey square next
to the 'eye' icon for the non-active 'Blur' layer - a 'chain-link' icon will appear
and the two 'Blur' layers are now linked).
Go to the fly-out layer menu (top
RH of layer palette) and choose 'New Set from Linked'.
A
Layer Set' will appear at the top of the layer stack.
The two 'Blur' layers
are inside this Layer Set. (To view and work further on these layers, click on
the large arrow on the Layer Set to the left of the 'folder').
You can 'name'
the Layer Set if you wish, just like a normal Layer (name it 'Blur' perhaps).
Layer
Mask Note:
If you are uncertain about using a 'Layer Mask', click on the
'link' at the base of the page.
A
'Layer Mask' is the preferred method to restore all or part of the original picture
by selectively erasing areas of the two 'Blur' Layers by working on the Layer
'Group' (or 'Set').
Ensure that the 'Group' is active (highlighted) then
click on the Layer Mask icon at the base of the Layers palette. A Layer Mask will
appear on the Layer 'Group' itself. Using black as the Foreground colour and a
suitable brush, sections of the 'Blur' 'Group' can be selectively erased to reveal
the Background image below. To restore the effect, swap to white as the foreground
colour and use the brush again. In this way the image can be made as a combination
of diffused areas and the original picture.
Sharpening may be applied to the image but remember to only apply this to the original image (beneath the 'Blur' Layer 'Group')
Should selective erasing of one of the 'Blur' Layers be required, then create a 'Layer Mask' on the required 'Blur' Layer within the Layer 'Group'.
I find the eyes, lips, and areas of the hair, when revealed by the 'Layer Mask' create that esential sparkle and focal points that are important for the picture.