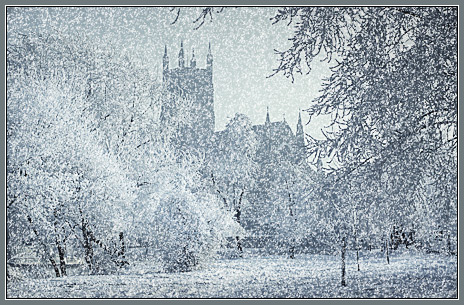
'Creating a 'Snowstorm' Effect'
Clive R. Haynes FRPS
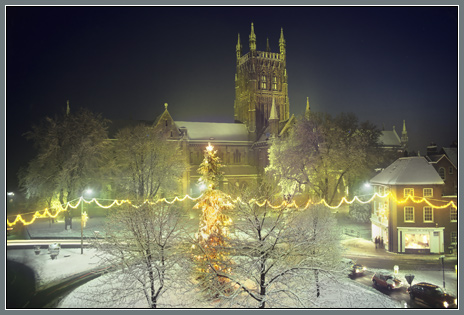
Open
the Image as a 'Background'
Make a new (empty) layer above the Background
layer
Fill with
50% Gray via Edit > Fill > Use 50% Gray > OK
The image layer fills with Grey
Go to Filter
> Noise > Add Noise
Choose 'Gaussian' and 'Monochromatic' settings
For
the 'Amount' put in between 200% and 280%
Click OK
The
screen is now a 'storm' of black & white 'noise'.
The white parts will become
our 'snowflakes'.
Use
the Magic Wand to select the 'white noise' pixels.
To make this simple, zoom
in to a large magnification, say 800% to 1600% and click on a white pixel, 'marching
ants' appear as a 'mesh' all over the image.
Note:
The Magic Wand tool options should be set for:
Tolerance 0 (zero)
Anti-Aliased
- off
Contiguous - off
In addition, the Eyedropper Tool; should be set for 'Point Sample'. If the Eyedropper option is set to '3 x 3 average' or '5 x 5 average' the individual white pixels will not be selected, instead the entire image area will be selected.
To
continue:
Select > Modify Selection
Contract by 1 pixel
OK
Select
> Modify Selection
Expand by 1pxl or 2pxls
OK
Inverse Selection by Select > Inverse Selection (Ctrl + Shift + I)
Press 'Delete' to remove the unwanted pixels
Inverse Selection again by Select > Inverse Selection (Ctrl + Shift + I) to activate the required pixels
Option:
Save the Selection by Select > Save Selection
Name it 'Snow Medium'
This
is an option that allows a return to the selection.
It's useful for making
additional layers of 'snow' which can be 'fine' or 'heavy' depending upon how
the selection is modified by 'contract' or 'expand'.
To
continue:
Create a new (empty) layer above the Gray / Noise layer
Edit
> Fill > Use > White
OK
Deselect via Select > Deselect (Ctrl + D)
Turn
off the Gray / Noise layer (it's done its job)
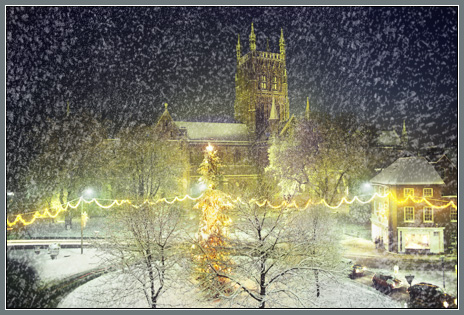
Static 'snow flakes' now
fill the image area.
Motion
Blur can be applied to give an amount of movement.
Go to Filter > Blur > Motion
Blur and adjust both 'Angle' and 'Distance' to suit.
Adjust the opacity of
the 'snow' layer to best effect.
Apply a Layer Mask to the 'snow' layer to selectively erase areas as required.
Refinements:
Create a
new layer and load the 'Snow Medium' selection saved earlier.
Expand the selection
slightly to make larger 'flakes'.
NB.
Sometimes expanding the selection can be problematical as expanding by as little
as 1 pixel can result in the whole area being 'selected' as the 'snowflakes' join
up!
Expanding can also make the snow too dense.
Should either be a problem,
go to the alternative methods described below.
To
continue:
Fill with white and Deselect.
Apply Motion Blur as appropriate
(choose a different amount)
To
make smaller 'flakes'
See below
NB. Remember to create a new layer for each density of snowfall
Alternative
methods for Snowflake size
An alternative method for creating larger and smaller
snowflakes it to use Edit > Transform > Scale facility. Begin with the 'static
snowflakes'.
For larger flakes simply transform and enlarge to suit.
For
smaller snowflakes
Transform the 'static snowflakes' to a reduced size
Turn
off all layers except for the 'Static Snowflake' layer (as the 'Pattern' will
be created from all 'visible layers') Select an area (must be a square-cornered
non-feathered selection) then use Edit > Define Pattern, name it and click OK.
Load the pattern to a new layer via Edit > Fill > Use > Pattern (just made)
The 'snowflake' pattern appears
Use the 'Clone' tool to fill in the gaps
in the tile pattern created.
Use 'Motion Blur' as described earlier
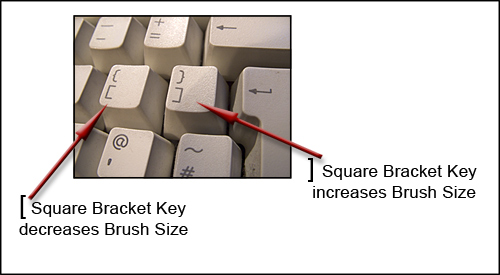
To create some really large snowflakes, try using the 'Rough Round Bristle' brush in the CS brushes list (about four-up from the base of the list it's preset to 100). Use the square bracket keys [ and ] to enlarge the brush size and with white as the foreground colour, apply with a 'dabbing' motion to apply to a separate layer.
Experiment
with different 'Blend Modes' for the 'Snow Layers'.
Try 'Dissolve' blend -
creates a 'sparkle' effect with reduced layer opacity.
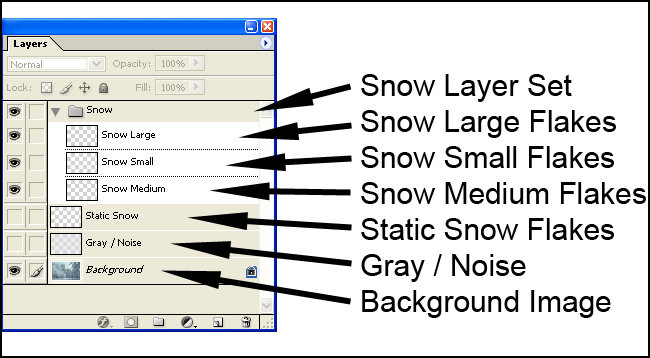
It's a good idea to create a 'Layer Set' for the Snow Layers. This will tidy them away and to enable a Layer Mask to be added to the whole set if required.
To create a Layer Set, link the Snow Layers using the 'Link' icon and with the fly-out layer menu (top RH of layer palette), choose 'New Set from Linked'.
Remember, the process described above is very dependent upon file size and a great deal of experimentation is required to refine the technique for an individual image.
I have presented a 'working starting point' - have lots of fun in the snow!