The 'Art
History Brush' ![]()
Clive R. Haynes FRPS
For CS6 and CC Versions
If you are arriving at this page as a 'starting point' and you're uncertain about using 'History', its options and the general operation of the 'History Brush', please click this link to the introductory page:
History Brush
You may also find that an appreciation of 'Future History' may help.
Many people regard the Art History Brush as difficult and wayward to use, however the following guidelines offer a starting point to successful use of this creative and expressive Photoshop tool.
One thing that tends to put people off using this brush is its apparent uncontrollability, usually this is because they haven’t explored the brush style options fully enough.
If you are interested in purely factual 'record' style photography then this tool will probably not be for you. However if you enjoy experimenting and creating very different, expressive, non-figurative and painterly types of pictures, then this brush will introduce you to a new range of options.
The workflow will include references to features such as 'Layer Masks', 'Adjustment Layers' and 'Blending Modes'. If you are unfamiliar with any of these features, it would be advisable to discover more about how they work.
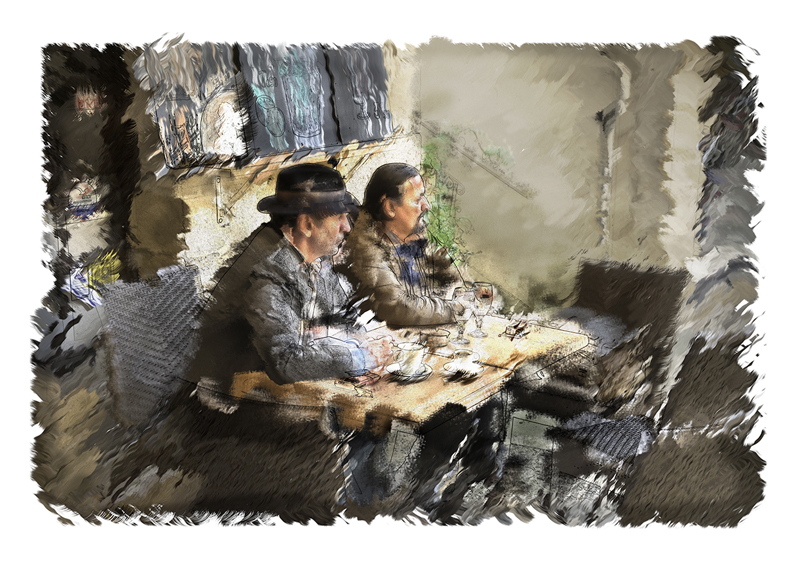
What follows is a sequence of work to provide an 'artistic effect' - one that will separate the image from photographic reality and imbue it with a personal expression of mood and texture. However, please remember that results are dependent upon factors such as image size, brush size, opacity, blend, layer order, stroke direction, brush type and how the brush is 'edited' - not forgetting your own personal visualisation of the scene!
The Brush
Choose the Art History Brush from the Tool Bar. It shares the same icon position as the History Brush (Brush with an anti-clockwise arrow). Left-click on the icon, hold-down to reveal both brush types. Choose the one with the anti-clockwise swirl – this is the Art History Brush.
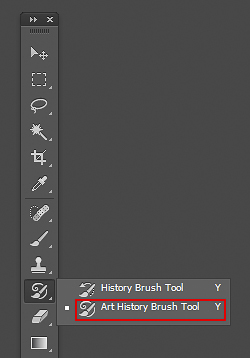
Locating the Art History Brush
From the Tool Bar, select the Art History Brush - it's combined with the 'History Brush' Tool
Before You Start Work on the Picture
You'll
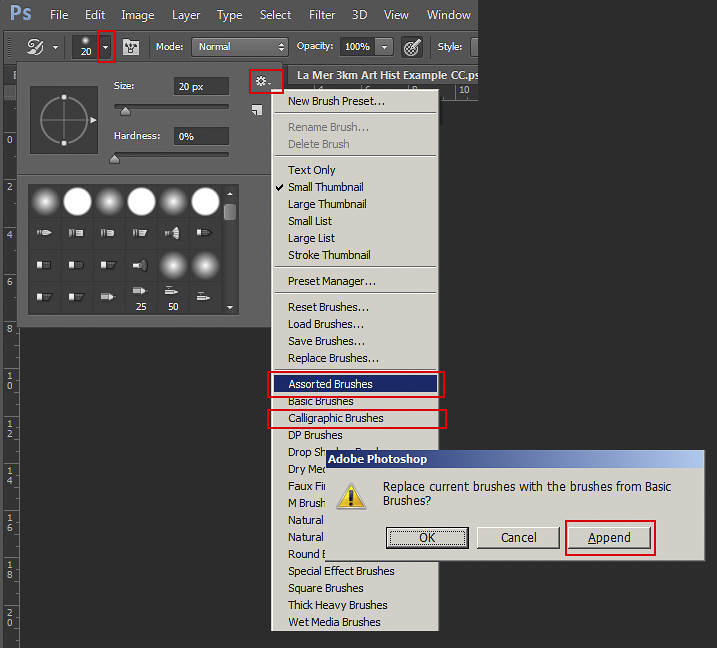
need a good range of brushes to choose from, so If you haven’t already done this, add the set of ‘Assorted Brushes’. Go to the ‘Brush Size Preset’ (it’s the small box at the left side of the Options Bar). There will be a brush showing with a number. The number merely represents the diameter of the brush size in pixels. Click on the down arrow to open the pre-set, click on the small top-right cogwheel (or arrow for pre CS6 / CC versions) and the drop down menu appears. Choose ‘Assorted Brushes’. In the next box to appear, click on ‘Append’.
The ‘Assorted Brushes’ now appear within the sets of brushes. They aren’t specifically identified as such but you’ll see them; they include some weird shapes - and several work really well. They often work better at small size, but naturally the ‘painting’ process takes longer. Some of the squiggly-looking brushes work well as do the ‘triangle’ and ‘diamond’ shapes. It’s also a good idea to load and append ‘Calligraphic Brushes’.
See below.
My intent is for an artistic rendering which leaves a romantic photographic impression rather than a stridently 'arty' appearance. The progressive stages and detail views in following pages will illustrate the brushwork in greater detail.
The principles involved in working with this image will help with your use and appreciation of the 'Art History Brush'