The 'Art
History Brush' ![]()
Clive R. Haynes FRPS
For CS6 and CC Versions
Important
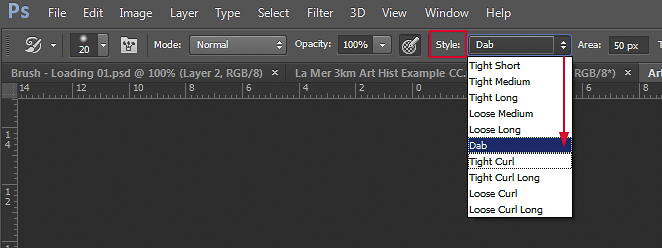
Choosing the correct Brush Style is your key to success.
After selecting the Art History Brush, go to the options bar along the top and set the Style to ‘Dab’.
For the purposes of traditional painting most of the others on the list are useless.

Options Bar: Brush ‘Area’
The effect of changing the ‘Area’ (of the brush) from its default position of 50px is not easy to explain but easy to see on-screen. I suggest that you find out by experimenting (max setting is 500px). However, in essence this setting alters the ‘jittery area’ of the ‘bristles’, the higher the setting the larger ‘jitter area’ becomes. The choice of setting is down to your artistic discretion.
Options Bar: Brush ‘Tolerance’
Rather like the ‘Area’ setting, it’s easier to see than to explain. Once again experiment by changing the setting from (default) zero to higher values (max 100). You’ll notice that higher values give greater ‘granularity’ and coarser edges within the bristle structure.
To sum this up: Increasing the values of both ‘Area’ and ‘Tolerance’ render coarser-looking paintwork.
Options Bar: Opacity Setting. If you use a mouse then set the opacity needed for a series of brush-strokes. Graphic Tablet and Pen users needn’t worry about this as ‘Pressure Sensitivity’ will enable different densities of opacity – but do read the special note below.
Editing the Brush: Opening the Brush Panel
The Brush Options Bar shows the ‘Brush Panel’ icon – it’s at the top towards the left - there’s a tiny square with three ‘brush-heads’ – you’ll see it. (Illustrated below).
To open, double-click the icon.
 The Brush Panel Icon
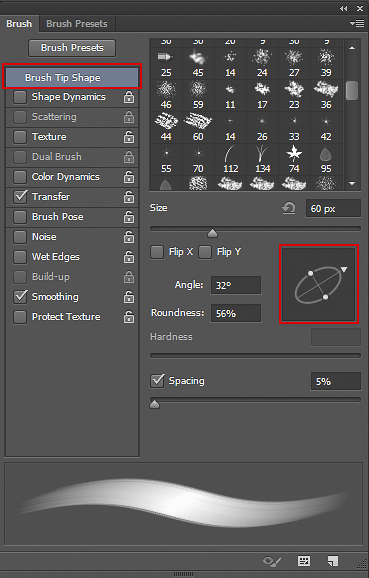
A Really Important Note for Graphic Tablet & Pen Users:
The ‘Transfer’ option must be active (ticked) to allow pen-pressure sensitivity. However you must click on the ‘Transfer’ ‘box’/’button’ itself to open the Transfer settings options. Once this opens, set the ‘Opacity Jitter Control’ to ‘Pen Pressure’ with the ‘Minimum’ slider at zero. ‘Opacity Jitter’ and ‘Flow Jitter’ both remain at (default) zero setting. You will have to tick the ‘Transfer’ option and set the ‘Pen Pressure’ for each brush selected. (Please Adobe, why can’t we have the option of a ‘global setting’ for all brushes?). Also, unless it’s a particular requirement, I suggest that you un-tick the Shape Dynamics option.
To continue:
Editing the Brush TipShape.
This is Really Useful.
Click on the ‘Brush Tip Shape Button’: Within this dialogue box you can select the brush type and very importantly change the brush appearance and brush angle. The brush can be rotated (click/drag arrow), expanded or squeezed (by click/drag side ‘handles’) and the ‘X’ and ‘Y’ features of the brush can be selected/deselected.