BASIC IMAGE MANIPULATION & MOVEMENT
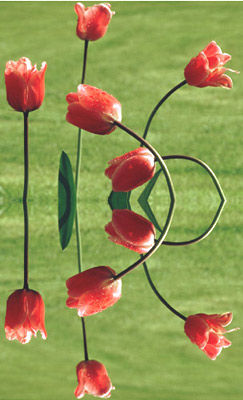
MAKING MIRROR IMAGES
and
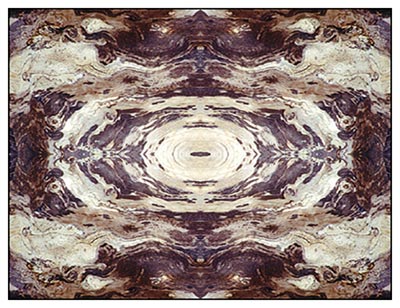
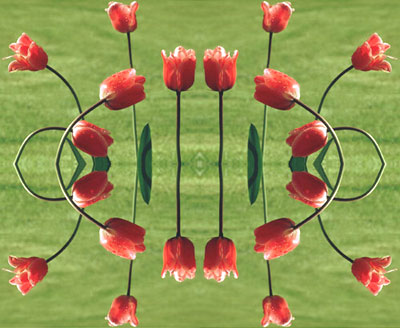
KALEIDOSCOPIC PATTERN PICTURES
A USEFUL EXERCISE FOR YOU TO TRY
(For worked example images scroll to base of page)
Clive R. Haynes FRPS
What follows is a useful exercise for developing and refining the skills of expanding the canvas size, flipping & rotating the image via 'Transform', positioning the individual images to form patterns and an introduction to the hierarchy of 'layers'.
Start by selecting an image that will look interesting as a ‘mirror image or when repeated as a kaleidoscopic pattern.
Image Size
Open the image and note the dimensions. To do this, go to Image > Image Size.
If you wish to change the dimensions of the image, change either Width or Height, depending upon which is the constraining proportion for the final picture – remembering too that at this stage you are only dealing with half of the finished image. At this stage the image size isn’t critical, as it can be re-sized later. However, when changing Image Size – make certain that ‘Resample’ is not ticked!
Copying
You need to copy the image you’re to make a mirror image of.
Go to Select > All (‘Marching Ants’ appear around the image).
Then, Edit > Copy. This places the image on the ‘clipboard’, ready for use.
Doubling Up the Area
To create the extra space required, increase the canvas size.
Go to Image > Canvas Size
If you are making a ‘mirror image where the additional space is required beneath, then double the Height. For a side-by-side image, double the Width. The easy way to do this is to use the drop down menu and select 'percent' then change the amount to 200. (The original canvas size would have been 100% so making it 200% doubles it).
For convenience, use the little lay-out box in the Canvas Size dialogue box. The lay-out box has nine squares and allows you to position the image within the to-be-expanded Canvas area. If you miss this, don’t worry, the image can be re-positioned later by using the ‘Move’ tool.
Having chosen the new canvas size and made your (optional) decision about position, look at the File Size information in this same dialogue box – your file size will have just about doubled – compare ‘Current Size’ to ‘New Size’ info. This is because the new canvas area is in fact an ‘active’ area for the picture space and will soon become the new image size. New pixels have been made to accommodate the changes you are about to make.
When you click ‘OK’ the additional space will adopt the colour of the background you have running – usually white but don’t be too shocked if some other colour appears. To check on this, look at your Foreground/Background colours at the base of the Tool Box. To re-set to the default B/G & F/G colours, click on the little black & white overlapping squares (bot lh corner of the Tool Box). To swap F/G for B/G colour, click on the double ended curved arrow to the top rh of the overlapping F/G & B/G squares.
If you wish to change the background colour, either repeat the ‘Canvas Sizing’ steps above, with your new F/G & B/G colours (say, Black/White) or choose the ‘Paint Bucket’ from the tool Box. Make certain that the Foreground colour is White (or your required colour) and click in the space you wish to fill.
Should this be unsuccessful for reasons of spillage into the picture area then Undo (via Edit > Undo or Ctrl + Z) and this time use the rectangular Marquee Tool to select the space and fill the area with either the Paint Bucket.
Alternatively, go to Edit > Fill > Foreground (or choose 'Background' or ‘White’ - the latter via the drop-down6arrow in the 'Use' box) and click ‘OK’.
Phew! I know this looks like a lot of work but it's all quite logical when you start working. It also allows scope for changes to be made.
Pasting
To paste the image you copied earlier.
Go to Edit > Paste and behold, it appears on top of the original picture. Take a look at the Layers Palette and as if by magic a new layer will have been added above the background layer. Select the Move tool from the Tool Box (top rh corner) and drag the image on this new layer to a suitable position.
Note: to make any change to one image or the other, the Layer it’s on must be made ‘active’ – do this simply by clicking on it (mouse) or touching it (pen/tablet).
Making the ‘Mirror’ Image
You’re now ready to make the 'Mirror Image’ from the one you pasted-in.
Approximately position it in the space, then go to Edit > Transform > Flip Vertical. The image can now be positioned with greater accuracy. Use a combination of the Move Tool and the four directional arrows (active when Move Tool is selected) which are located between the main keypad area and the numeric pad on the keyboard. A single touch moves the image 1 pixel, holding an arrow key down moves the image 10 pixels at a time.
To create a Kaleidoscope image
The procedure is similar to that listed above, only this time a greater Canvas area will be required – double in both height & width. Tip: use the 'percentage' method decribed above. You will also need to flip the image horizontally too (all available via the Edit > Transform menu). The trick is to think ahead one-step at a time and work out where you are going.
Something About Layers
Tip: think of Layers as sheets of transparent film, one stacked above the other. The transparency/Opacity of the Layer may be altered by the Opacity adjustment (small box with % sign) in the Layers palette.
Each layer can be labelled to help you to identify it. To do this, double click on the active (blue) layer and in the Layer Options Box that appears, type in the ‘Name’ box and click OK. The layer now has a label. You may change this at any time by the same procedure. Alternatively, the Layer Options dialogue box may be accessed via Layer > Layer Options or via the arrow at the top rh of the Layers Palette and then to ‘Layer Options’. Or by right clicking the mouse on the active layer and selecting Layer Options.
When you are working on an image with multiple layers, a layer may be dragged to a new position in the stack. Simply click on it and push it up or pull it down and let go.
Note: the Backgound Layer cannot be moved unless its name is changed from 'Background'. Do this by double clicking on the Background layer and in the 'Make a Layer' box that appears; choose the default, 'Layer 0' or type a name.
 |
|
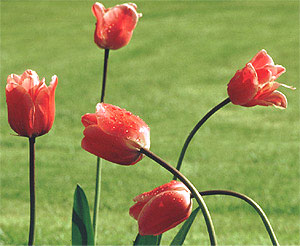
Stage 1
- original image
|
 |
|
Stage 2
- the mirror image
|
 |
|
Stage 3-
the kaleidoscopic image
|
|
RELATED
TOPICS
|