Stamp Visible
Clive R. Haynes FRPS
There are times when you are working upon an image with multiple Layers when it would be useful to be able to make a new Layer which would consolidate all the work done to that point, and incorporate it into a single 'flattened Layer' within the Layer structure. It's rather like taking a 'snapshot' of the image at a particular stage, that is editable in its own right.
Photoshop does provide for this, but for some reason best known to Adobe, the procedure is far from obvious and there's no one simple go-to menu item or button to click.
The ability to make one consolidated (flattened) Layer is known as 'Stamp Visible'. Think of it as making a 'stamp' or 'impression' of all visible layers.
How's it done?
A Stamp Visible Layer can be made in two ways:
Firstly make certain the Layers you wish to merge are visible (eye icons 'on')
Quickest method (the one I use): Activate the top Layer, whether it's an image Layer or an Adjustment Layer, hold down Ctrl+Shift+Alt+E and you get 'Stamp Visible'.
Less intuitive method: Activate the top Layer whether it's an image Layer or an Adjustment Layer. Go to the top menu, click on Layer > Merge Visible, keep holding down the left mouse button and click Alt. Release mouse and you get Stamp Visible. Well, I did say it was less intuitive.
As a step during the management of the image, 'Stamp Visible' will appear in the History Palette.
The function is useful for all sorts of on-going editing. For example,if you have a multi layered image, perhaps including some filters and special effects, Layers of different opacities and Layer Masks, then you notice some 'Cloning' or 'Healing' is required that can only be successfully done on what would, in effect, be a 'flattened Layer', make a Stamp Visible Layer, deal with the work and continue from there.
Or, perhaps you have a multi-Layered image then want to apply a plug-in filter to the composite. Make a 'Stamp Visible' Layer - easy.
Making a Stamp Visible Layer allows you to keep a 'flattened' version of the image within the Layer structure.
You can have as many 'Stamp Visible' Layers in the Layer structure as you wish. I use them on a regular basis and frequently they're a 'life saver'.
As a 'worked example' let's take a look at the image below which has five layers: Background, Topaz 'Gritty', two sets of Curve Adjustment Layers and a replacement sky. I want to add another Topaz effect, this time from the their 'Impressions' set of Plug-Ins. To do this I need to create a composite ('flattened') Layer, the sum total of the work to date and apply the Topaz filter to that.
To demonstrate this I've chosen the image below.

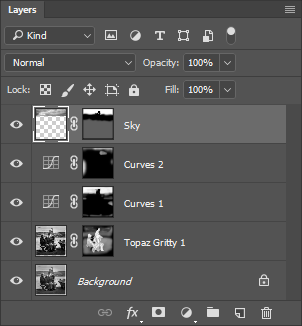
Above: five layers, Background, Topaz 'Gritty', two sets of Curve Adjustment Layers and a replacement sky.
To continue, click on the link below.....