Smart Objects
and
Smart Filters continued ......
Clive R. Haynes FRPS
If you need another Smart Filter on the same Smart Object Layer, then simply select the required Filter from the Filter menu, however, please note that the mask facility for the Smart Filter layer remains as a single mask that will simultaneously influence one or more filters within that Smart Object Layer.
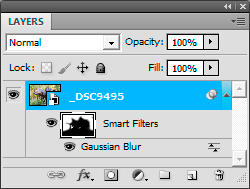
Above: Smart Filter complete with edit to its Mask
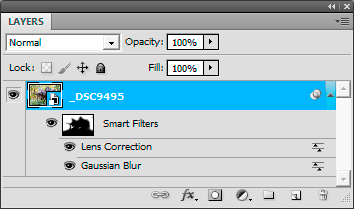
Above: A second Smart Filter has been added to the Smart Object Layer. However, note that the Mask for the Smart Filters Layer will be common to both Filters
Should you need a Smart Filter with an independent mask, copy the Smart Object layer complete with its Smart Filter and right-click > Clear Smart Filters, then select another filter from the Filter Menu.

Above: An additional, independent Smart Filter added to a Smart Filter Layer Copy
Note: You'll notice a Layer Mask on the Smart Object Copy Layer, more about this 'extra' below....
Becoming More Adventurous
Another option is to apply a Smart Filter to another Smart Object Layer whilst utilising the shape/characteristics of a mask in a previous layer. This sounds complicated, let me explain.
Taking as an example an image where we wish to blur the background and sharpen the foreground yet retain the ability to edit both filters when desired.
Add the first Smart Filter, choosing Filter > Blur > Gaussian Blur and set the blur amount. Work on the mask on the for the Smart Filter Layer to edit where it's needed. Do this by using black or white as the Foreground Colour and a suitable Brush to 'paint' , thus making the application of the the blur selective.
Once the blur Smart Filter has been edited, it's time to create a 'sharpen layer' to emphasise the foreground. How useful it would be to utilise the shape of the mask already made for the blur layer as a precision mask for the sharpened layer, the two masks would fit precisely with a seamless join. This is what you do:
Copy the (Blur) Smart Filter Layer by right/click > New Smart Object via Copy.
Working on the copy, right/click > Delete Smart Filter.
Next, Ctrl/click on the mask thumbnail for the Blur Smart Filter Layer, 'Marching Ants' appear defining the mask edit.
With the Smart Object Copy layer active, Alt/click on the Layer Mask icon at base of Layers Palette (small grey square with white circle). This will apply a 'Hide All' Layer Mask which is the precise invert (or negative) of the blur mask. Click on the image thumbnail for this Copy Layer, go to the Filter Menu and choose Sharpen > Unsharp Mask. Make adjustments to the sharpness.
You now have two precision masks; one for blur and one for sharpen. As Smart Filters are 'lossless', further adjustments can be made to refine the image.
Making Transformations with a Smart Object Layer
It's really useful to make Transformation' edits (Edit > Transform or Ctrl+T for Free Transform') with the knowledge that any such edits are non-destructive to pixels. This means, for example, that if Perspective Transformation' didn't do the job you needed the first time, the image can be transformed again without any losses.
Converting a New or Existing Image Layer to a Smart Object
Working on an image that wasn't imported from ACR as a Smart Object or on an image that was, copied/pasted from another source, the layer can be made a Smart Object by right-clicking on the Layer and choosing Convert to Smart Object'. The new Smart Object layer will now have all the attributes of a Smart Object except the ability to edit in ACR and revisit the RAW file.
A Brief Note about Exclusions with Smart Objects
The Smart Object Layer excludes the use certain tools and features, this includes Healing and Cloning Tools. To carry out such functions, the Smart Object layer will either need to be rasterized (right-click on the layer and choose Rasterize Layer') or, alternatively, the layer(s) copied to make a Stamp Visible' layer by Ctrl + Shift + Alt + E.