Layers
Understanding the Basics - continued
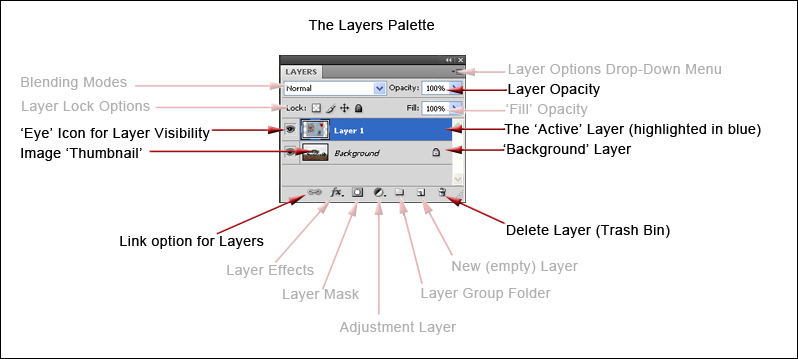
The Layers Palette
Clive R. Haynes FRPS
Looks complicated doesn't it? However, read on and all will be explained ......
Referring to the example set of layers above, here's a quick run-through, clockwise from the top right:
Oh, and don't worry, many of the features and options mentioned in this overview are presented for completeness. Certain things like Layer Options, Fill Opacity, Adjustment Layers, Groups, Locks and Blending Modes are items which if you are a beginner you need not worry about for a while.
To help, I've 'greyed-out' the layers and options that you don't need to be concerned with just yet.
The complete and more complex list is presented in 'More Complex Layer Structure'
Layer Opacity: Clicking on this will reveal a 'slider' control. The opacity of the layer can be varied from 0% to 100%. The opacity of the layer determines its strength / visibility. With settings less than 100% it becomes possible to see the image on the layer below.
The 'Active' Layer (Highlighted in Blue): Clicking on a layer will activate it; by convention the layer assumes a blue tone. The colour can be changed if required (most people don't bother). To perform a task on a particular layer you must first 'activate' the layer.
Background Layer: This is the base or bottom layer in the layer structure. Notice the 'Lock' icon: this indicates that the layer cannot be moved to another position in the stack, its pixels are also 'locked' and the image cannot be moved within the picture / canvas area. The lock is a default condition. Should it be necessary to move the Background Layer to a new position in the layer stack, it may be unlocked (double-click the layer).
Delete Layer (Trash Bin): You may delete a layer by dragging and dropping it into the bin or by highlighting the layer and clicking on the bin. A box will ask if you are sure?
Link option for Layers: Tagging two or more Layers with a Link enables the images upon linked layers to be repositioned (moved around) in unison within the picture area. Activate the layers you wish to 'link' by successively Ctrl-clicking the layers. Should you make a mistake and wish to de-select a layer, Ctrl-click on it again. Next, click on the 'Link' icon and 'Link icons' will appear on the layers selected.
Image Thumbnail: Image Layers always include a miniature (Thumbnail) version of the image upon the layer.
'Eye' icon for Layer Visibility: Clicking on the Eye' icon will turn on / off the layer thus making it visible or invisible.