The History Brush - 'Making History Work for You'
Clive R. Haynes FRPS
Most people use the 'History Palette' as a 'rescue device' - a way of returning to an earlier state during the evolution of a picture. Before exploring the 'History Brush', here's a brief 'History Primer'.
The History Palette's normal 'default' condition displays the last 20 functions ('states') performed. The number of 'states' can be changed. Should you wish to do this go to Edit > Preferences > General and change the number in the 'History States' box, click OK.
Remember, the more 'History States' you set, the amount of memory assigned to this function will also increase. Also remember that 'History is volatile' - that is, it will be erased as soon as you close the file. Next time you open the image, the 'History' will be void and begin anew.
As one progresses through the various states when working on an image, the states are 'recorded'. When the figure for the maximum number of states is exceeded, the 'state' at the top of the list disappears and is replaced by the one below it and so on.
To preserve one of the 'states' in the list, click in the small square to the left of the required state in the History Palette and as the list creeps toward the top of the stack, the chosen 'sate' will remain fixed at the top. See below:

It's possible to preserve more than one state by making 'Snapshots'.
Taking a closer look at the History Palette, click on the fly-out arrow at the upper right corner. This reveals a menu which includes 'New Snapshot'. A 'Snapshot' is a moment in time that can be held as short-term memory in 'History'. Many 'Snapshots' can be taken and each one given a title if needed.
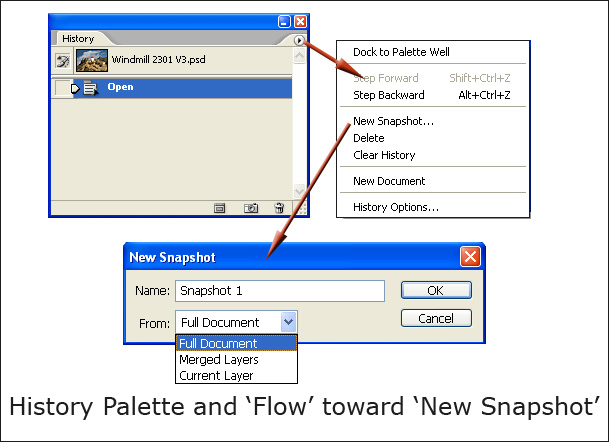
To return to any given 'state' simply click on it.
The
History Brush in Use
We can make practical use of a 'History State' or
'Snapshot' by using the 'History Brush'.
Open an image, make a number of changes to the content without affecting image size, 'Transforming', changing 'Mode', altering 'Canvas Size' or doing anything to alter the 'pixel count' - if you do, a 'No Entry' sign will appear when you attempt to use the History Brush.
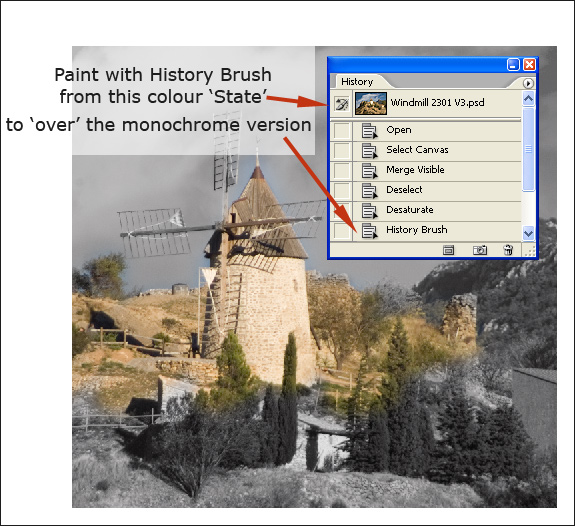
By either choosing an earlier History State in the stack or a 'Snapshot', click in the small square in the 'state' to nominate this 'state' as the source for the History Brush.
Return to the bottom of the History stack and continue working, the 'old' history state imagery will appear and paint over the existing state.
Try
this exercise:
Open an image and Desaturate it (Ctrl + Shift + U) - making
it monochrome.
Place the 'History Brush' in the 'Open' state.
Return to the 'new', monochrome condition and paint the original colour back in using the History Brush.
A better working practice is to create a New (empty) Layer and 'paint' on this layer using the 'History Brush'. The 'new' Layer allows more flexibility for editing later and it can be deleted at any time.
Another
option is to choose a textured or 'art brush' from the range of brushes - this
creates yet more effects.
See 'screen grab' below:
Painting from 'Future History' This sounds paradoxical, yet it's entirely possible.
To discover more, click on the 'link' below.