| 'High
Dynamic Range' (HDR)
with
'RAW' Files Clive
R. Haynes FRPS |
| |
| Using
the 'Bridge' facility within 'Photoshop CS2' it's possible to automatically combine
two or more separate exposures of the same subject in such a way as to preserve
the best tonal components from each image. The result is a composite picture with
a well-managed tonal range. |
| |
This
technique is particularly effective when faced with a subject that has a tonal
range beyond which a single exposure, even allowing for the extended capture range
that Camera RAW, can cope with. |
|
This
particular problem has always been possible to deal with by making a series of
exposures ('exposure bracketing') ensuring that at least one shot captures the
highlight detail and another shot captures the shadow detail. Each image is opened
and its tonal range optimised. Next, the images are be imported, in register,
into a single, multi-layer document then by using 'Layer Mask' techniques, the
best parts of each image layer are revealed. |
|
Remember
that when making the initial exposures a tripod will be necessary to keep the
shots in register. |
|
'Photoshop
CS2' presents another way of dealing with this High Dynamic Range conundrum. |
|
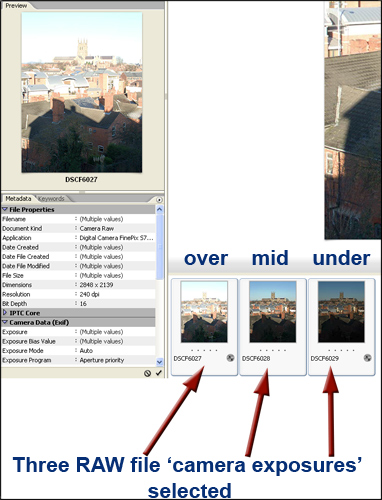
Place
the camera on a tripod and make a series of exposures to capture the complete
range of tones - ensure both highlight and shadow detail.
|
|
Go
to 'Bridge' and open the series of pictures. Select (by Ctrl / Clicking) the required
images. The images will be processed one by one and appear as a composite. When
the composite appears, a small dialogue box will show and allow the 'White Point'
to be adjusted. Also, to the left of the composite, 'thumbnails' appear showing
the images that make up the composite. Individual 'thumbnail' images may be turned
off (by using the adjacent 'tick box') and the effect upon the composite observed.
Note also that the composite image will be 32 bit. |
| |
|
| |
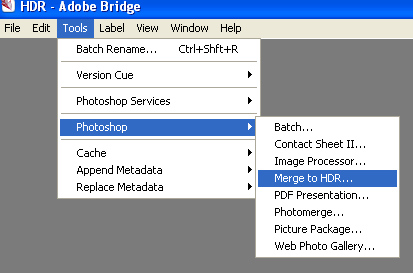
Next,
go to the Bridge Menu Bar in and choose Tool > Photoshop > Merge to HDR. |
| |
|
| |
Once
the composite exposure has been accepted the picture opens in Photoshop. As 32
bit working not only produces a massive file size but also affords very limited
access to program features, it's preferable to change the mode to either 16 bit
or 8 bit working. Whichever 'mode' is chosen (via Image > Mode > 8 bit or 16 bit),
another dialogue box will appear which enables 'Exposure' and 'Gamma' levels to
be set. This dialogue box has an expanding section that allows the 'Toning Curve
and Histogram' to be adjusted. Note: the 'curve' may only be adjusted if 'Local
Adaptation' is selected from the 'Method' drop-down menu. |
|
|
| |
| When
you are content with the tonal range, click 'OK' and the image opens. |
|
| At
this point the image may be treated as a 'normal' 'Photoshop' file and adjusted
/ manipulated as needed in the usual way. |
|
| Please
note, this method can only be applied by opening separate exposures made in-camera.
It will not function if an attempt is made to open the same image, adjusted to
different settings via the 'Camera RAW' dialogue box. |
|
|
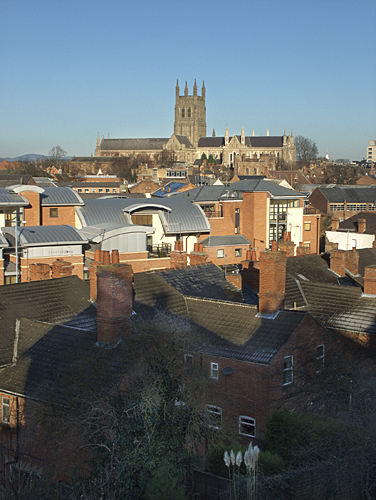
HDR
Composite Image with a Full Range of Tones |