|
Compositing Technique Importing the Correct Size Image into Your Picture Clive R. Haynes FRPS |
|
| Importing an image of incorrect size (too large or too small) is undesirable, as significant re-sizing will corrupt details. Its much better to import the image at the size you need. This is how. | |
 |
|
| Step | |
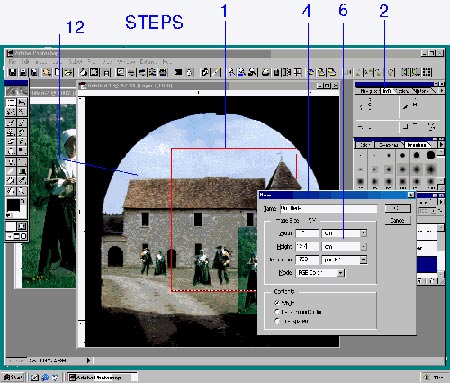
| 1 | Use the rectangular marquee tool to define the size of the area into which the new image is to be brought. This will establish the size of the image you wish to paste. |
| 2 | Look at the Info tab (in the Navigator palette of options) and note the W and H sizes |
| 3 | Go to Image > Image Size and note the Resolution, expressed in Pixels Per Inch (or cm if you prefer). This is the size of file (Mb) that you will need to import containing the new, scanned image. |
| 4 | Go to File > New and create a new document. Its called New. |
| 5 | Make certain that the Resolution is identical to the image youre working on. If it isnt then change it (simply type in the correct figure). |
| 6 | Enter the Width (W) and Height (H) as per the Info Box figures (W &H) from the image youre working on. |
| 7 | Note the File Size - this will be used in a few moments Close the 'New' file it only served as a reference to discover the file size required. |
| 8 | Go to your scanner and adjust the marquee around the area of the image you wish to import (try to keep the proportions similar to the area you intend it for). |
| 9 | Set the scanner Resolution to the same as the destination image (see step 3). |
| 10 | Adjust
the scanner to give the same or slightly larger file size (in Mb) to that
required noted from step 7. Do this by altering the percentage setting or the resolution setting (a series of guesses until about right) for the scan or by typing in the file size (Mb) required, however not all scanner software will give this latter option. If in doubt always opt for a slightly greater file size, as re-sizing downwards is not such a problem. All that you are aiming for is the correct file size in Mb. |
| 11 | Scan in the usual way. If necessary, rotate the image so its the right way around. |
| With both 'windows' visible (that is destination/original image and imported image) use the Move tool in Photoshop (arrow icon, top right of Tool Box) drag and drop the newly scanned image into the picture area. Lo and behold, the image you have just imported is the correct size or very close. And it appears on a separate layer. | |
| Make any further size adjustments, if required, via the Edit Transform menu. |
|
|
|
|